
TL;DR
Moving your rig into a closet can drastically reduce noise and echo. Key strategies include controlling sound reflections, sealing gaps, and ensuring proper ventilation. Proper placement and layered damping turn small spaces into effective recording zones.
Imagine transforming a tiny, echo-prone closet into a clean, quiet space perfect for voiceovers or music. It’s not about buying endless foam or sealing every crack — it’s about smart placement, layered dampening, and understanding how sound behaves in tight spaces. This guide cuts through the noise, showing you how to make your closet work for you, not against you. For more tips, see acoustic dampening, placement, and the “Rig in the Closet” setup.
If you’re tired of unwanted echoes, boomy lows, or your neighbors hearing every vocal take, this isn’t just theory. It’s real-world, proven advice to turn your closet into a professional-sounding booth — without blowing your budget or knocking down walls.
Acoustic dampening
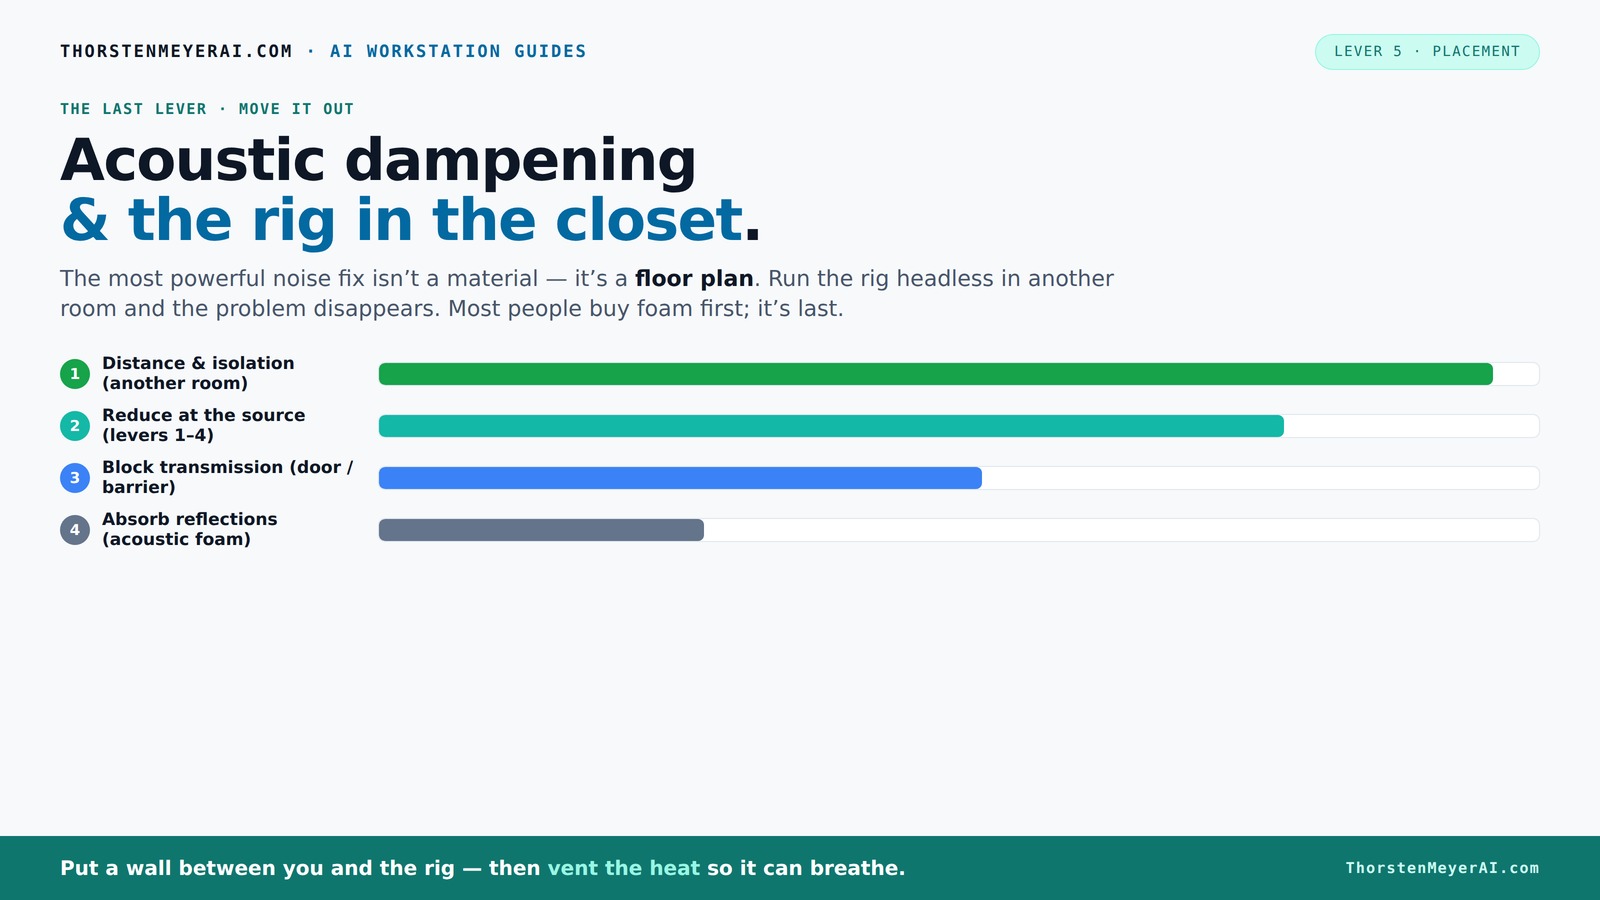
& the rig in the closet.
The most powerful noise fix isn’t a material — it’s a floor plan. A rig you can’t hear because it’s in another room beats any amount of foam. Tap the approaches in Part 1 to see what actually works.
(another room)
(levers 1–4)
(door / barrier)
(acoustic foam)
Contain the noise, not the heat
Key Takeaways
- Prioritize distance and isolation; moving your rig into another room is the most effective noise reduction.
- Layered damping — combining absorption, sealing gaps, and decoupling — beats buying expensive foam alone.
- Identify reflection points with a mirror and treat those spots first for quick sound improvements.
- Ensure proper ventilation in a closet rig to prevent heat buildup and gear overheating.
- Use DIY materials like blankets, rugs, and weatherstripping to dramatically improve sound quality on a budget.

Focusound 52 Pack Acoustic Foam Panels 1" x 12" x 12" Sound Proof Foam Panles Soundproofing Noise Cancelling Wedge Panels for Home Office Recoding Studio with 300PCS Double-Side Adhesive
- Soundproofing Design: Triangular grooves for noise absorption
- Includes Adhesive Tape: 300pcs strong double-sided adhesive included
- Easy Installation: Removable adhesive protects walls
As an affiliate, we earn on qualifying purchases.
As an affiliate, we earn on qualifying purchases.
Why a Closet Can Be Your Best Recording Spot (If You Do It Right)
A closet might seem like a tiny, echoey box, but it has huge potential. When you record in a small space, the sound bounces off walls quickly, creating a textured, sometimes harsh echo. The good news? You can control this with simple tweaks.
Think of your closet as a natural, semi-isolated environment. It can block out external noise and reduce room reflections, especially if you add some treatment. Plus, it’s easy to keep your gear hidden and safe from dust or accidental bumps. For voice work, a closet often beats a large, untreated room — if you treat it well.
Most voice actors and podcasters have discovered that with a few layers of absorption and smart placement, their closet turns into a surprisingly clean, controlled space. It’s all about understanding how sound moves in tight corners and how to tame it effectively. You can learn more about acoustic dampening and placement.
Acoustic Dampening vs. Soundproofing — Why They’re Not the Same and What Works in Your Closet
Acoustic dampening and soundproofing are often confused, but they’re fundamentally different. Dampening is about controlling reflections and echo within a space. Soundproofing stops sound from leaking out or coming in. In a small closet, you want both — but each requires different tactics.
Acoustic dampening materials like foam panels, blankets, or rugs absorb sound waves bouncing around, softening harsh reflections. Soundproofing involves sealing gaps, adding mass (like drywall), and decoupling surfaces to block sound transmission.
For example, adding foam to the walls will make your voice clearer by reducing echo, but sealing the door gaps with weatherstripping and adding mass will stop your neighbor from hearing your recordings. Essentially, dampening makes your closet sound better; soundproofing keeps the noise contained.
Understanding this distinction is crucial because it helps you prioritize your efforts. Over-treating with foam without sealing gaps might improve sound quality inside the closet but won't prevent sound from leaking out. Conversely, sealing gaps without dampening can trap sound inside, creating a muffled environment that’s still echoey. The key is a balanced approach tailored to your specific needs.
Best Materials for Sound Control in Small Closets — What Really Works
In a tiny space, your goal is to reduce reflections and prevent sound leaks without installing a studio in drywall. Here are proven materials: Check out more about acoustic treatment materials.
- **Acoustic panels**: 2-inch thick foam or mineral wool panels placed at reflection points. They’re light, effective, and easy to install. Placing them at reflection points intercepts sound waves before they bounce back into your mic, directly improving clarity and reducing harshness.
- **Moving blankets**: Thick, dense blankets that absorb sound and can be draped over walls, doors, or even the ceiling — a budget hero. They work by diffusing and absorbing sound energy, but their effectiveness depends on coverage and placement. Overusing blankets may reduce room liveliness excessively, so balance is key.
- **Weatherstripping and sealant**: Seal every gap around the door and vents. Sound leaks like crazy through cracks, undermining your entire effort. Proper sealing ensures that the sound you treat inside stays contained, maximizing your dampening investments.
- **Rugs and soft surfaces**: Cover floors with thick rugs or carpets to tame reflections on the ground. Hard floors bounce sound waves upward, contributing to a boxy, echoey sound. Soft surfaces absorb and diffuse, creating a more natural acoustic environment.
- **Bass traps**: If your closet sounds boomy at low frequencies, adding bass traps in corners helps tame the low-end buildup — especially with parallel walls. These traps absorb the energy that causes low-frequency resonances, preventing muddiness in your recordings.
Recent DIY advice emphasizes layering these materials at reflection points, corners, and openings — not just throwing foam everywhere. Strategic placement maximizes their effectiveness and avoids over-treatment, which can dull your sound unnecessarily. For detailed guidance, see this article on acoustic dampening.
Want a detailed breakdown? Check out this guide to [materials that work in small rooms](https://thorstenmeyerai.com/reduce-heat-noise-ai-workstation/).
Where to Place Treatment for Maximum Sound Improvement
Placement is everything. In a small closet, focus on the main reflection points — these are where sound bounces directly off surfaces back into your mic. Use a mirror to spot these spots: where the reflection hits your face from the microphone position. Learn more about proper acoustic placement.
Here's a quick step-by-step:
- Identify the main reflection points — typically walls and ceiling near your mic and speaker.
- Place absorption panels directly at these points to soak up those echoes. Proper placement ensures that sound waves are absorbed at the earliest possible point, preventing them from bouncing around and creating muddiness or echo in your recordings.
- Seal gaps around the door with weatherstripping; add a door sweep if needed. This prevents sound from leaking in or out, maintaining your controlled environment.
- Layer blankets or foam on the ceiling if reflections come from above. Ceiling treatment is often overlooked but can significantly reduce flutter echoes and reflections that bounce downward. For tips on effective acoustic treatment, visit this guide on acoustic treatment.
- In corners, add bass traps if you notice low-end boom. Corners are where low frequencies tend to accumulate, so treating these spots prevents muddiness and improves clarity across the spectrum.
For example, if you record with a mic on a desk, treating the wall behind the mic and the ceiling above will significantly improve sound quality. The goal? Keep direct sound clear, and reflections softened to avoid a boxy or muddy tone.
Common Mistakes That Ruin Your Closet’s Sound Quality
Even smart setups can go wrong without realizing it. Here are the biggest pitfalls:
- **Over-treating with foam everywhere**: It’s tempting but unnecessary. Focus on reflection points and openings. Excessive foam can deaden the space too much, making your recordings sound unnatural or muffled. Balance is key to maintaining a natural sound while reducing harsh reflections.
- **Ignoring the door gaps**: They leak sound like a sieve, ruining your efforts. Even the best treatment inside the closet is ineffective if sound escapes through unsealed gaps. Proper sealing ensures your efforts contain the sound and prevent external noise from seeping in.
- **Sealing the space without ventilation**: Trapped heat destroys your gear and ruins your soundproofing. Always add airflow solutions like vents or small fans. Overheating can cause equipment failure and increase humidity, which can damage gear and affect sound quality.
- **Using only foam panels**: Thin foam doesn’t tame bass or low frequencies. Get thicker panels or bass traps if needed. Without proper low-frequency treatment, your recordings may sound boomy or muffled, especially in small spaces.
- **Neglecting the floor**: Hard floors reflect sound. Use rugs or soft mats. This prevents ground bounce that can color your recordings with unwanted reflections.
For example, a podcaster sealed the closet door with foam but forgot to seal the gaps. The sound still leaks, and echo persists. Layer your approach and double-check leaks. Addressing all potential escape routes and reflection points creates a more controlled environment, leading to clearer recordings.
DIY Cost-Effective Ways to Make Your Closet Sound Better
You don’t need to spend a fortune. Here are DIY hacks that boost your sound quality without breaking the bank:
- **Use thick moving blankets**: Hang them on walls or over the door for quick absorption. Ensure they cover reflective surfaces to maximize their damping effect.
- **Seal gaps with weatherstripping or draft stoppers**: Cheap, effective, and immediate. This prevents sound leaks and enhances the overall effectiveness of your treatments.
- **Place rugs or carpets on the floor**: Absorbs ground reflections and prevents sound bouncing upward, which can cause a boxy tone.
- **Build or buy simple bass traps**: Use thick rockwool or acoustic foam in corners. Properly placed bass traps can drastically improve low-frequency response and prevent muddiness.
- **Create a layered barrier**: Drape blankets over foam panels for extra absorption. Combining materials increases damping efficiency and tailors the acoustic environment to your needs.
For example, a YouTuber used leftover bedding to line her closet, added weatherstripping, and placed a few DIY bass traps — the difference was night and day for vocal clarity. These simple steps demonstrate that effective sound treatment can be affordable and accessible, especially when you understand where to focus your efforts.
Frequently Asked Questions
Can I really use a closet for professional voice-over recordings?
Absolutely. With proper treatment — especially at reflection points and gaps — a closet can produce clean, broadcast-quality sound. Many voice actors swear by it, especially when space is tight.What’s the biggest mistake beginners make when treating a closet?
Most over-treat with foam everywhere or ignore gaps around the door. Both mistakes reduce effectiveness. Focus on reflection points and sealing gaps first.Should I add bass traps in such a small space?
Yes, if you notice a boomy low end or standing waves. Thick bass traps in corners can tame these issues and clarify your recordings.How do I stop sound from leaking through the door?
Seal gaps around the door with weatherstripping, consider adding a door sweep, and layer blankets or foam for extra absorption. These steps dramatically cut down leaks.Conclusion
Turning a closet into a quality recording space isn’t about fancy gear — it’s about strategic placement, layered dampening, and sealing the gaps. Think of your closet as a blank canvas. With simple tweaks, you can turn it into a surprisingly clear, quiet zone for voice or music.
Remember: the best soundproofing is distance, and the best dampening is layers. So, pick your closet, layer your materials, and let your voice shine through—quietly, and clearly.